Thermal Bridge Calculations can be tedious, challenging and many times have a relatively small impact on the building performance – HOWEVER, if not done, and done correctly can lead to major issues!
Thermal Bridge Calculations tell us 2 important things.
Have we over or underestimated the energy loss in our energy model (sometimes knows as a PSI-Value)
What is the minimum interior surface temperature. (sometimes known as fRsi or hygiene criteria)
Because, after all we don’t want puddles in our house…
Rochester Passive House Consulting was recently brought into a house to investigate a “wet floor”. The customer was claiming that when it was super cold outside they would get puddles at the outer edge of their new house, and it would lead to some mold growth on the baseboards and in the bathroom.
THE HISTORY
A little background on the house:
Its a small (1350 sqft) Slab on grade ranch.
It was built about 2-3 years ago.
The house is equipped with a commissioned Zehnder ERV.
Running in normal speed would give the house 1 full air exchange every 2.5 hours (0.4 air changes per hour)
Running in high speed would give the house 1 full air exchange every 1 hour and 40 minutes (0.6 air changes per hour)
The house is really tight – 0.8 ACH50 with the blower door
There are 3 occupants and a dog.
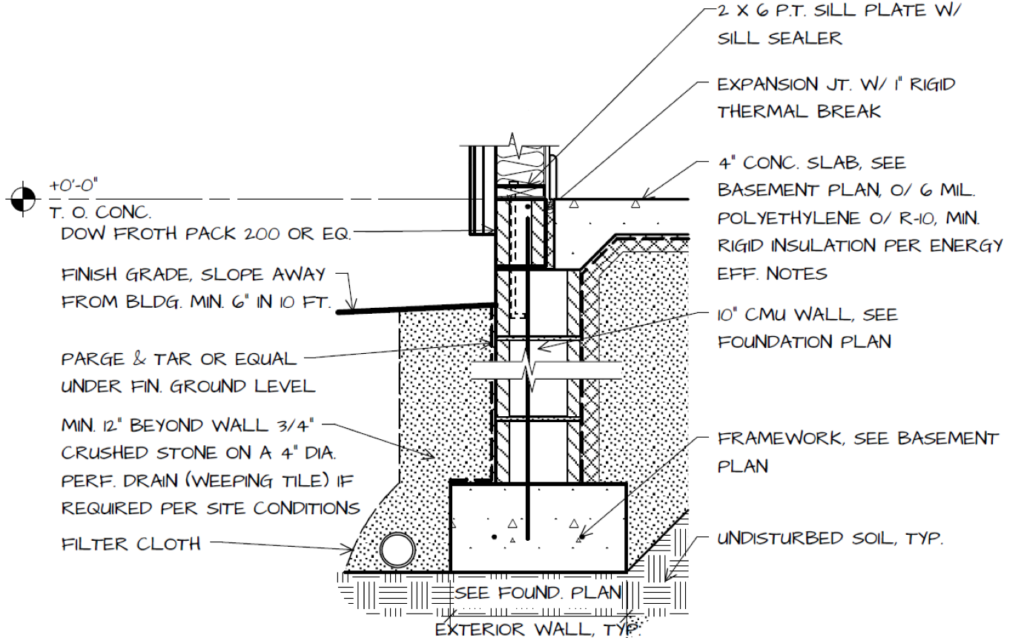
The builder was able to share with us the footer detail:
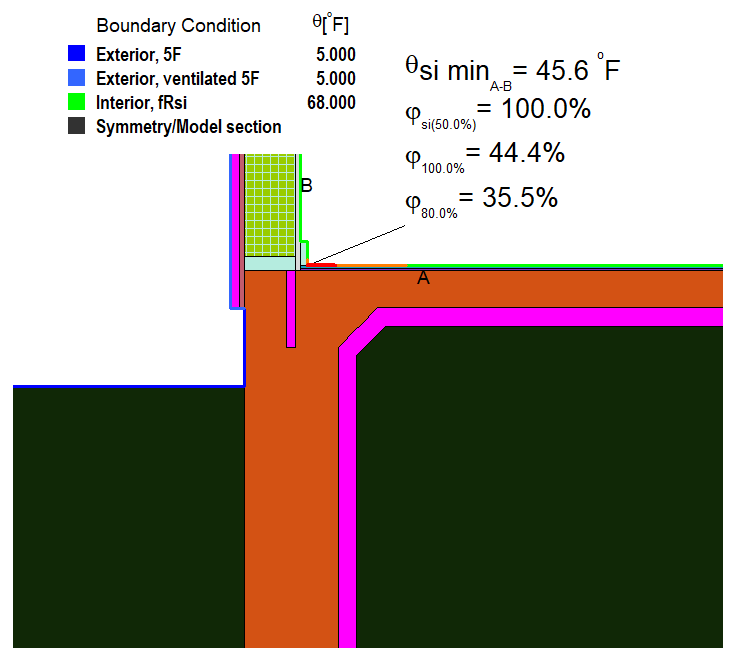
We decided to run a few – you guessed it – THERMAL BRIDGE CALCULATIONS using FLIXO to determine what an estimated interior surface temperature might be
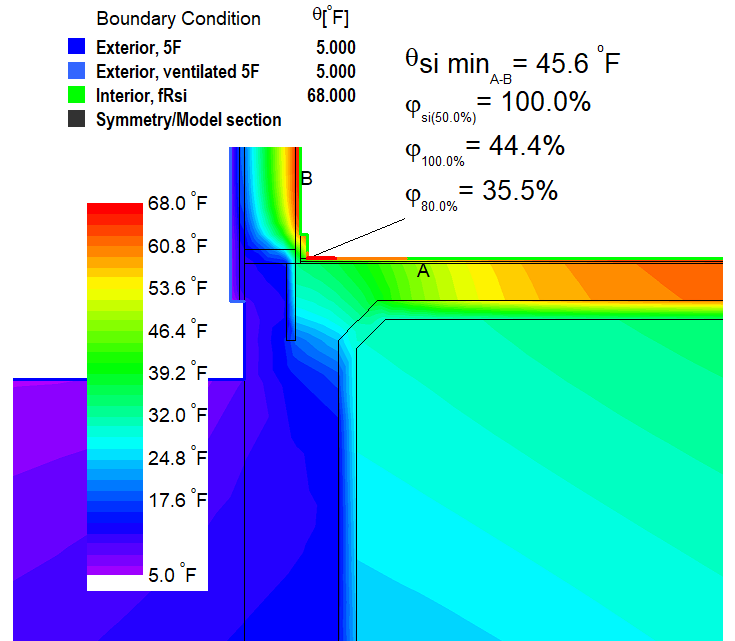
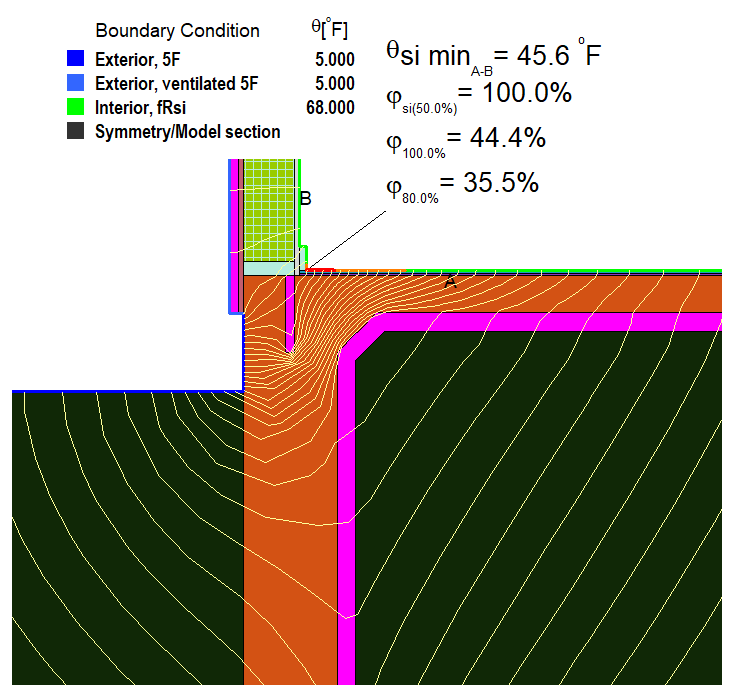
We decided to run the model at 5F outside, and we found that when the house relative humidity is above 44% you would get bulk water condensation. This area is represented by the red line on the floor of the detail above.Looking at this temperature field we can see the temperature gradient through this detail. The large area of green right at the outer edge of the floor is showing us, that indeed a substantial THERMAL BRIDGE exists.
IN A PERFECT WORLD
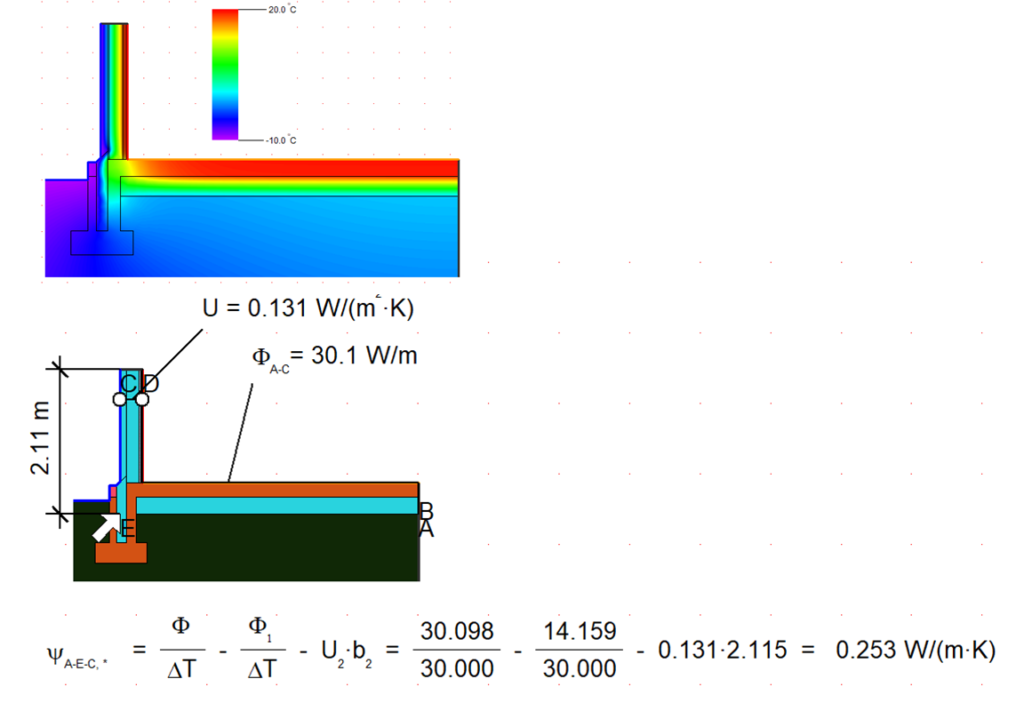
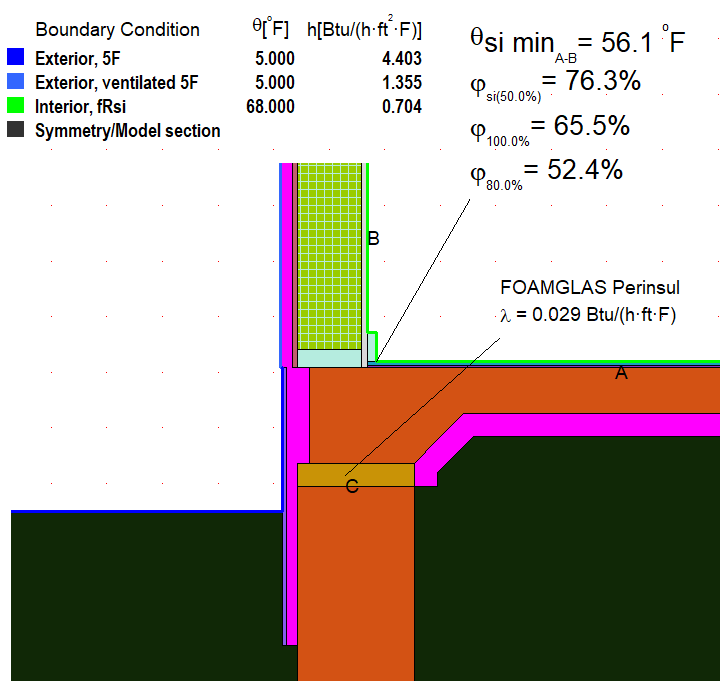
If we were in a situation where we were designing this from scratch, the detail would look something similar to this
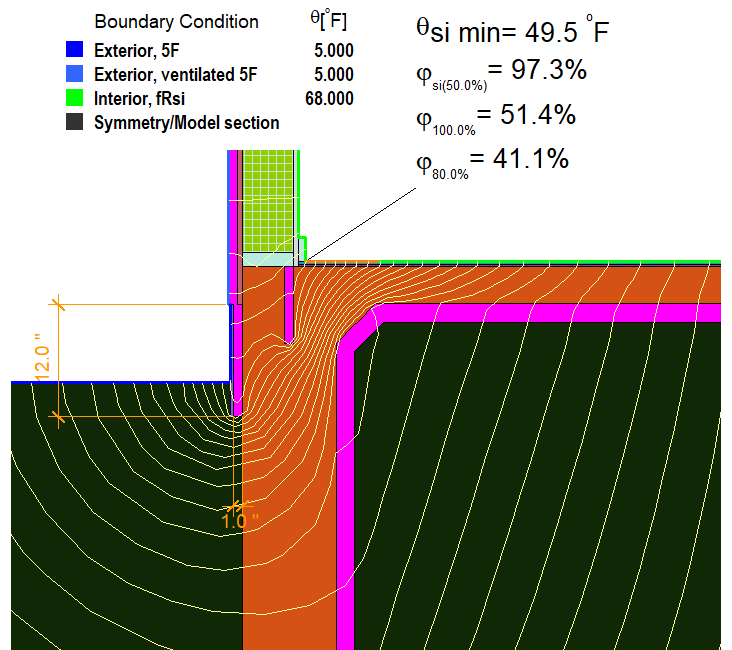
We have added the slab edge insulation with a stucco finish, and added a structural thermal break (called FOAMGLAS) This is a very strong structural insulating material that allows us to have continuous insulation between the sub slab insulation and the exterior slab edge insulationYou can see there is no risk of condensation or mold growth on the inside of the house unless the interior relative humidity was above 52% (when it is 5 F outside). This detail would be safe even in artic climates (The fRsi is above 0.8 for anyone technical out there)
Preparing for the Site Visit
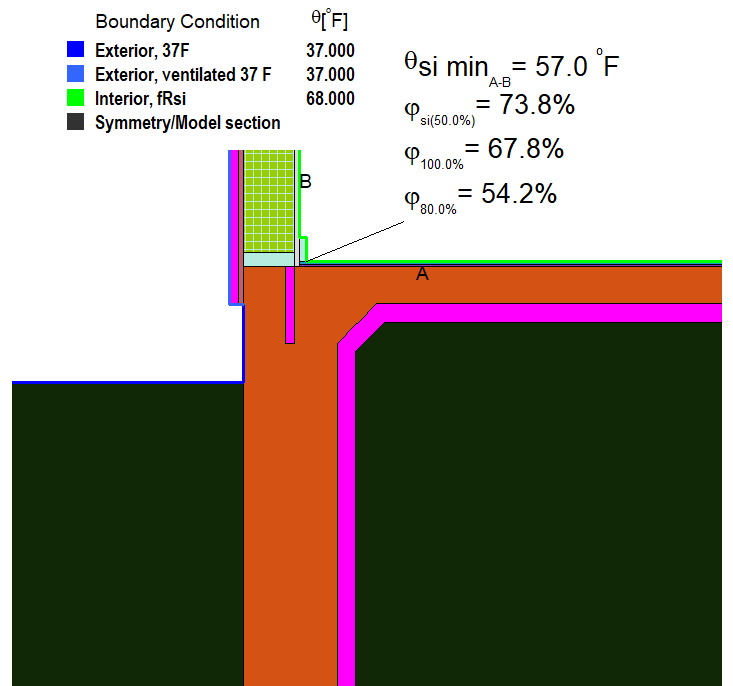
The morning we were to go to the house to investigate, we saw the outside temperature was going to be 37F, so we decided to rerun the model with actual outdoor temperatures – so we could confirm was an IR Cameral on site.
By running this model the lowest interior temperature we should see with the IR camera will be around 57 F AND there should not be any issues with condensation – but the floor will for sure feel coldWe should see average temperatures on the surface of the floors around 59 F or so – with the middle of the floor being around 66F
THE SITE VISIT
When we got to the house we verified the Zehnder air flows, and did a blower door test – and verified these were correct.
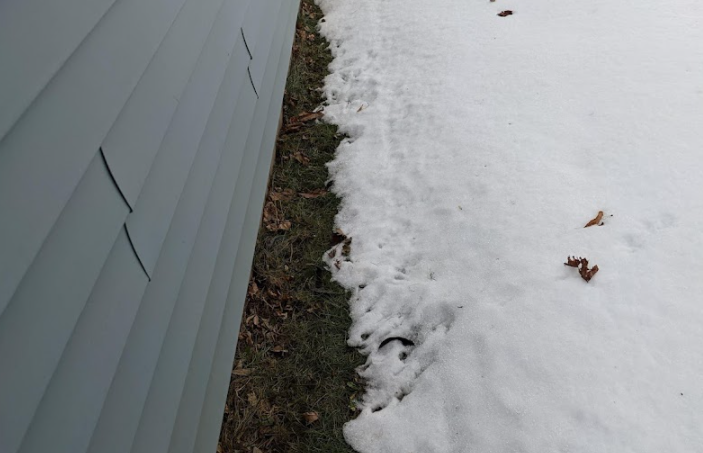
This photo was taken at the perimeter of the house. While there is over 12″ of snow in the yard, the entire perimeter of the house there was no snow. Now, maybe its because of the 24″ overhangs, but I think there is some heat loss from the slab edge happening here
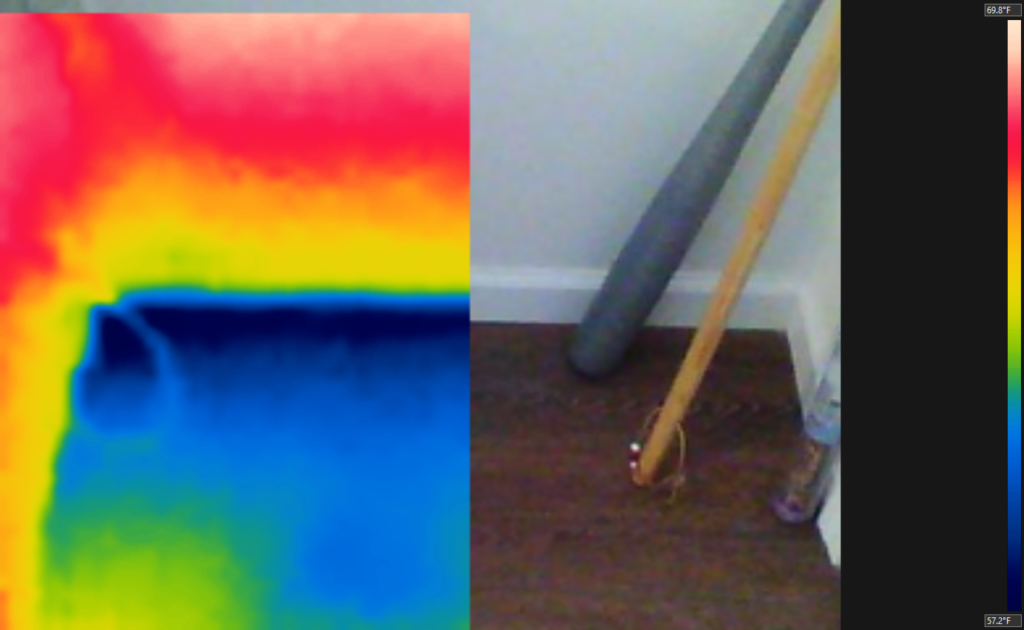
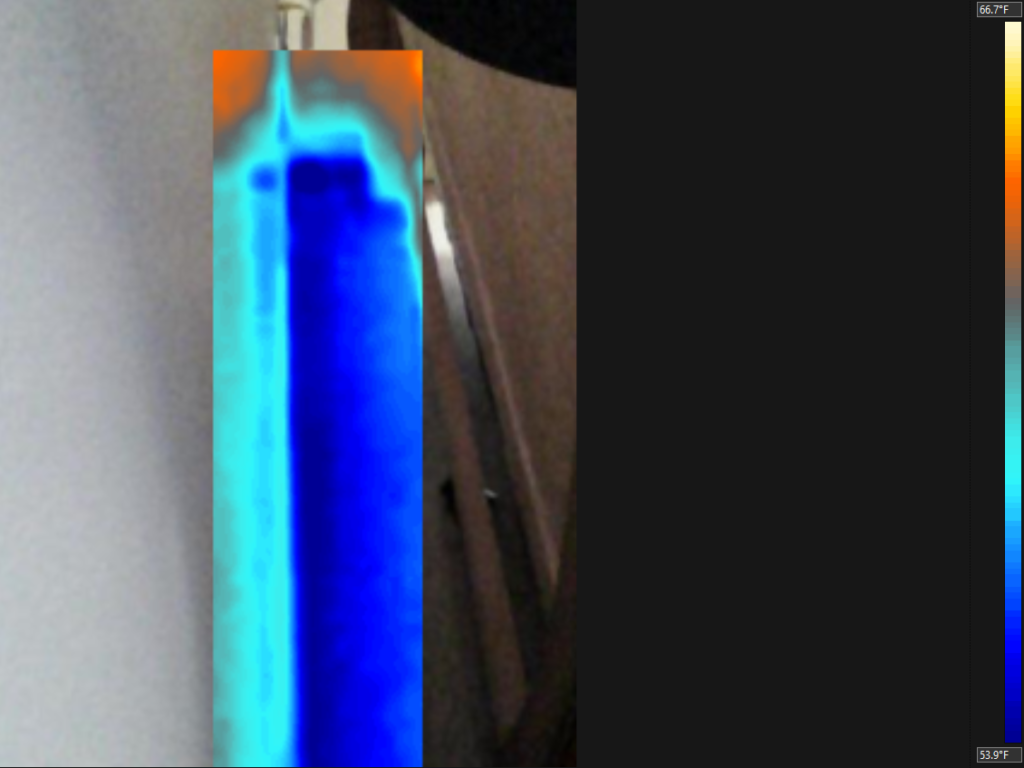
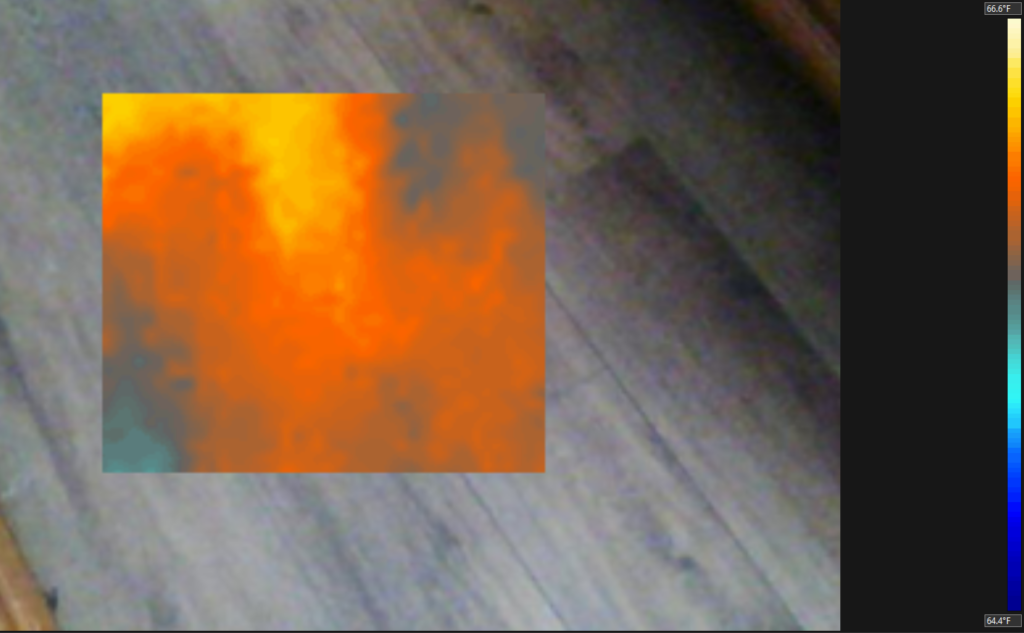
Here are some of the IR photos we took:From the Temperature Scale on the right of the image, you will see the “Black” color is showing 57.2 F – which is EXACTLY what the thermal bridge model showed we would have (within 0.2 F – give me a break). This image was taken from behind a bed – where air circulation is extremely poor. The surface temperatures were even colder: Around 54 F This image was taken in the middle of the floor. Temperatures range between 64-67 F (our model showed 65 F)
I love it when the simulation matches the real life situation!
THE FIX: (We ran 5 scenarios)
It is pretty clear that the slab edge detail needs to be addressed, but how? Using FLIXO we are able to iterate this detail to see what material, thickness, and depth we need to protect against this from happening again
Lets review the current detail – this time showing “streamlines” These lines show the direction of heat flow through the detail. Think of streamlines like cars on a highway. Where they are all following the path of least resistance to get inside as fast as possible.
Here we can see the energy flow through the exterior block and around the small slab edge break is resulting in the cold floor
Using a product called WallGUARD we can install an exterior insulation at the slab edge, and down the stem wall. Now we just need to know how large and thick we need to go.
Attempt #1 – 1″ thick x 12″ deep
Here we are showing a 1″ thick (plus 5/16″ concrete face for a total thickness of 1-5/16″) XPS insulation, that is a total of 12″ in length. By doing just this we have increased the minimum surface temperature almost 4 F, but we still run the risk of condensation if the relative humidity goes above 51%, and the risk of mold growth if the relative humidity goes above 41%
Attempt #2 – 1.5″ thick x 12″ deep
Here we are showing a 1.5″ thick (plus 5/16″ concrete face for a total thickness of 1-13/16″) XPS insulation, that is a total of 12″ in length. By doing just this we have increased the minimum surface temperature over 4 F, but we still run the risk of condensation if the relative humidity goes above 52%, and the risk of mold growth if the relative humidity goes above 41% This is a marginal improvement over the 1″ thickness
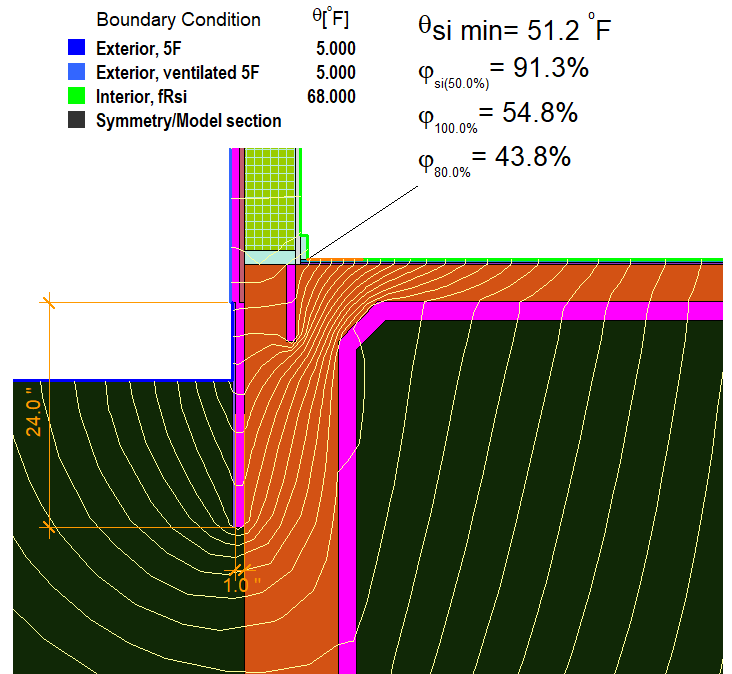
Attempt #3 – 1″ thick x 24″ deep
Here we are showing a 1″ thick (plus 5/16″ concrete face for a total thickness of 1-5/16″) XPS insulation, that is a total of 24″ in length. By doing just this we have increased the minimum surface temperature over 5.5 F, but we still run the risk of condensation if the relative humidity goes above 55%, and the risk of mold growth if the relative humidity goes above 44%
Attempt #4 – 1.5″ thick x 24″ deep
Here we are showing a 1.5″ thick (plus 5/16″ concrete face for a total thickness of 1-13/16″) XPS insulation, that is a total of 24″ in length. By doing just this we have increased the minimum surface temperature over 6 F. We only run the risk of condensation if the relative humidity goes above 56%, and the risk of mold growth if the relative humidity goes above 45%
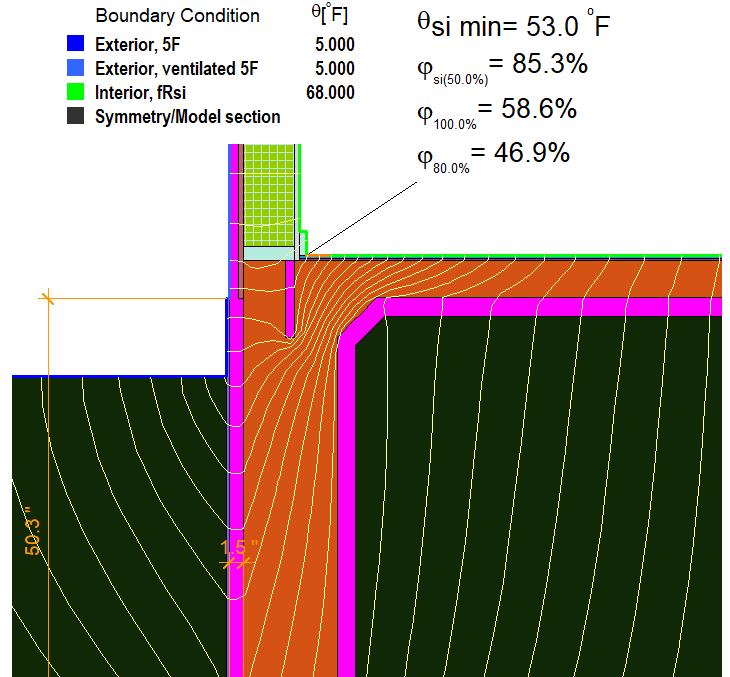
Attempt #5 – 1.5″ thick x down to top of footer
For comparative purposes: If we took this all the way down to top of footer for a total of 50″ in we would increased the minimum surface temperature over 7.4 F. We only run the risk of condensation if the relative humidity goes above 59%, and the risk of mold growth if the relative humidity goes above 47%. There is not much benefit to doing this far
By doing these quick iterations, we were able to give the builder some direction as to how far to take this solution. (We decided to go with “attempt #4” While the "we can try this, and if that doesn't work try that" philosophy might work most of the time, I have a feeling we only want to dig up around the foundation once, and make sure the solution we have come up with will work to help minimize future call backs.